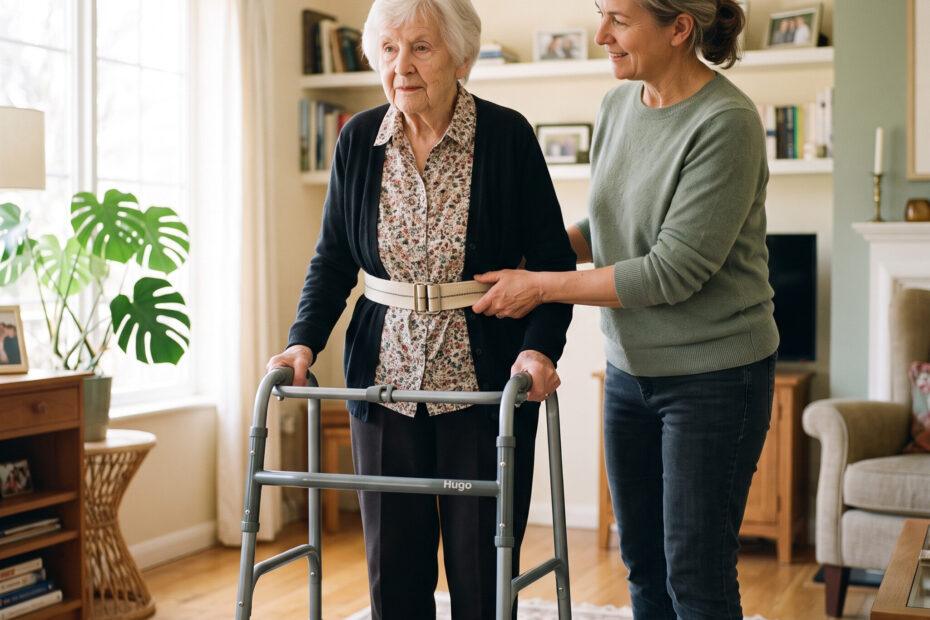
A gait belt is the cheapest, most useful piece of equipment in home caregiving, and it’s the one I see used incorrectly most often.
Usually it’s not dramatic.
The belt is on too loosely. It’s buckled over a nightgown that slides. Someone is gripping it overhand and pulling forward instead of supporting from behind.
None of that looks like a problem right up until the moment it is.
I’ve been a home health physical therapist for a long time, and I put a gait belt on patients almost every day.
Here’s how to use one properly — including the situations where you shouldn’t use one at all.
This is part of our complete guide to safe transfers at home.
What a Gait Belt Actually Does
A gait belt (also called a transfer belt) is a two-inch webbed strap that buckles around a person’s waist.
Most are 54 to 60 inches long, cotton or nylon, with either a metal loop buckle or a plastic quick-release.
That’s the whole product – under $15 for a decent one.
What it does is give you something safe to hold.
Without a belt, a caregiver helping someone stand grabs whatever’s available — a forearm, a hand, the back of a shirt, or worst of all, under the armpits.
All of those are bad options, and I’ll explain why in a second.
The belt puts a secure handhold right at the person’s center of gravity. That’s the single best place to control someone’s balance from, and it’s the reason the belt makes such a large difference for such a small price.
A properly fitted belt also makes it easy for caregivers to protect their backs and use proper form during transfers.
What it doesn’t do is let you lift someone. I want to say that early, because it’s the most dangerous misconception about this piece of equipment.
A gait belt is a stability aid for someone who can bear weight. It isn’t a lifting device and it doesn’t turn a two-person transfer into a one-person transfer.
Why Grabbing Arms and Clothing Is a Problem
Under the arms. Pulling up under someone’s armpits can injure or dislocate a shoulder, and it puts their entire body weight on your spine at the worst possible angle. It’s a common cause of caregiver back injury I see more than I should.
By the hand or forearm. Older skin is thin, and it’s thinner still on anyone taking steroids. Beyond that, pulling on an arm doesn’t support someone — it pulls them off balance and gives you no real control if they start to go.
By clothing. A waistband rides up. A shirt tears. Neither gives you a reliable hold, and both fail exactly when you need them.
The belt solves all three at once.
Before You Put One On: When Not to Use a Gait Belt
This section comes first on purpose. A gait belt applies pressure around the abdomen, and there are situations where that’s genuinely unsafe.
Do not use a gait belt if the person has:
- Recent abdominal, back, or chest surgery
- A known abdominal aortic aneurysm
- An ostomy, feeding tube (PEG), or suprapubic catheter
- A hernia at or near the waist
- Fractured or recently healing ribs
- Open wounds, a rash, or fragile skin at the waistline
- Severe breathing difficulty that worsens with pressure around the middle
- Severe pain in the abdomen or lower back
- Advanced pregnancy
Some of these are absolute and some depend on the specific situation.
If your loved one has had recent surgery or has any kind of tube or appliance at the waist, ask their physical therapist or physician before using a belt. That’s a two-minute phone call.
One more: never use a gait belt as a restraint. It’s not for securing someone to a chair, a bed, or a wheelchair. That’s both dangerous and, in most care settings, illegal.
A belt goes on when you’re actively helping someone move and comes off when you’re done.
How to Put a Gait Belt On
1. Tell them what you’re doing and ask permission.
This isn’t a formality. Reaching around someone’s waist without warning is startling, and startled people stiffen or pull away at exactly the wrong moment. “I’m going to put this belt around your waist so I can help you stand safely” takes three seconds.
2. Put it on over clothing. Never against bare skin.
The webbing will chafe and can tear fragile skin. If they’re in a hospital gown or a thin nightgown, that’s fine — but the belt goes over it, not under.
3. Apply it while they’re seated when you can.
Easier for both of you, and it means they’re not standing unsupported while you fuss with a buckle.
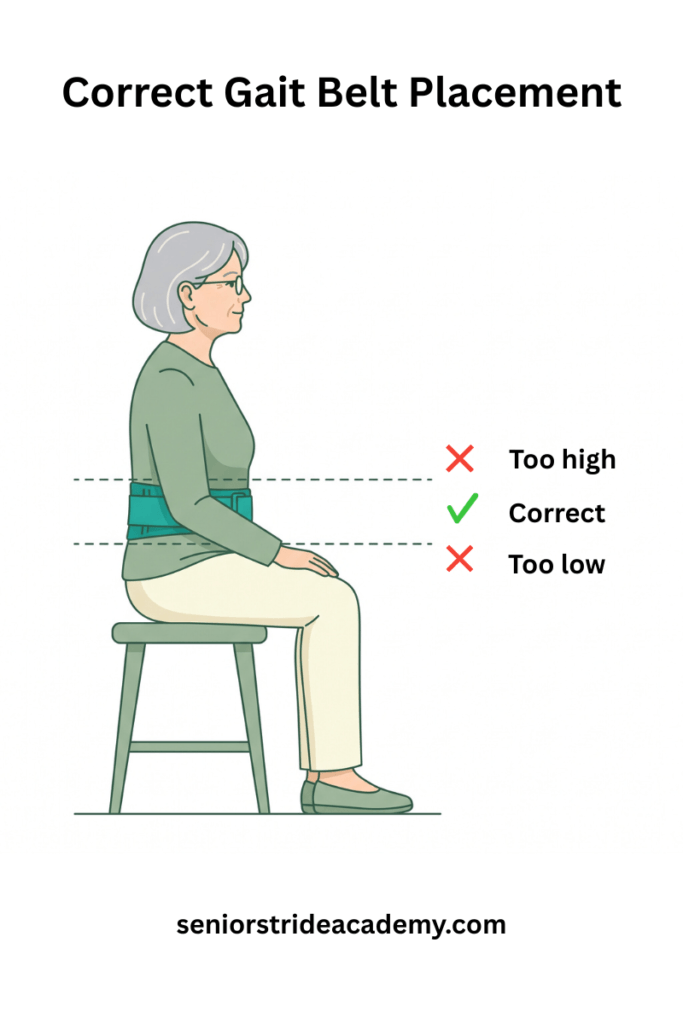
4. Position it at the natural waistline.
Above the hip bones, below the ribs. Too high and it presses on the rib cage; too low and it slides over the hips and gives you nothing to hold.
5. Buckle in front, slightly off-center.
Off to one side rather than directly over the spine or the belly button. It’s more comfortable when they sit back, and it keeps the buckle out of the way of your hands.
6. Check the tightness with the flat-hand test.
You should be able to slide your flat hand between the belt and their body — but not much more than that. Snug enough that it won’t ride up when you pull; loose enough that it isn’t restricting breathing.
A loose belt is the single most common error I see, and it’s a real hazard: it slides up under the ribs when you pull, which hurts and eliminates your control.
7. Tuck the excess strap.
A dangling tail is a trip hazard. Thread it back through or tuck it under the belt.
8. Ask how it feels.
Any pain, pressure, or difficulty breathing means take it off and reassess.
The Grip Most People Get Wrong
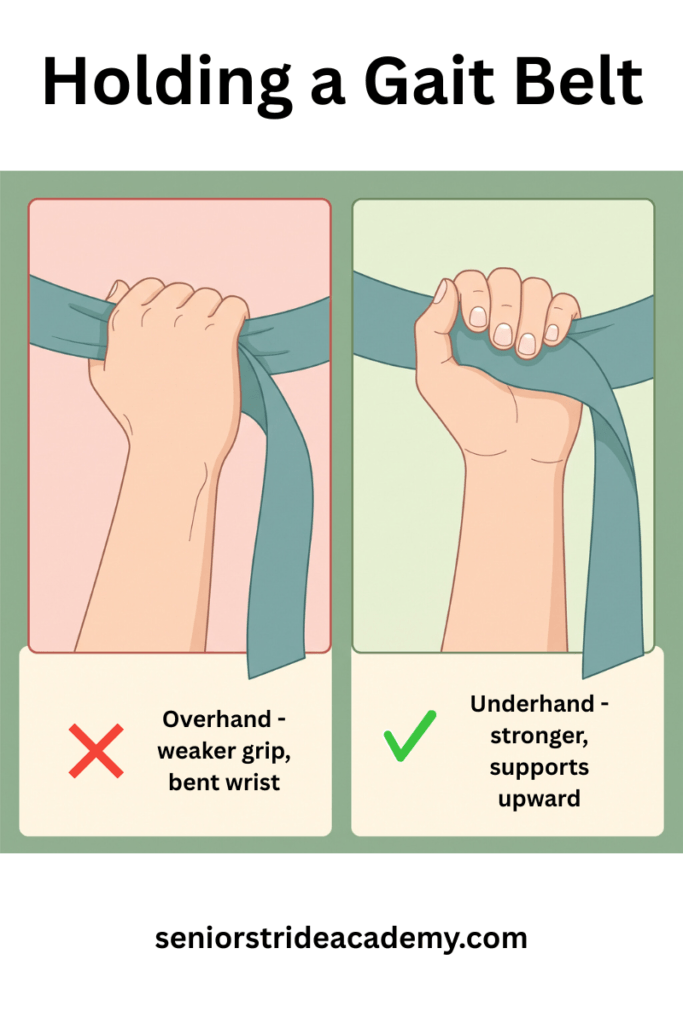
Hold the belt underhand — palm facing up.
Almost everyone instinctively grabs overhand, palm down. Underhand is stronger, it keeps your wrist in a neutral position, and it lets you support upward rather than just pulling backward.
It’s also much harder to lose your grip if the person’s weight shifts suddenly.
Grip at their side or back, not the front. You want to be positioned to steady and guide, not to pull them toward you.
For a transfer, use both hands on the belt. For walking, one hand at the back is usually enough.
Using the Belt for a Sit-to-Stand Transfer
This is the transfer you’ll do most often, so it’s worth doing well.
- Belt on, feet flat. Their feet should be flat on the floor and pulled back slightly under their knees. If their feet are out in front of them, they cannot stand, no matter how strong you are.
- Scoot to the edge. Have them shift forward to the front third of the chair.
- Set your stance. Stand in front of and slightly to their weaker side. Feet shoulder-width, one foot slightly ahead of the other. Knees bent, back straight.
- Grip underhand, both hands, at their sides.
- Have them push from the armrests. Their hands go on the chair arms, not on you. This matters — if they pull on your neck or arms, you both become unstable. If there are no armrests, have them push from the seat itself.
- Count it out. “Ready — one, two, three, stand.” Counting keeps you moving together instead of fighting each other.
- Rise as they rise. Straighten your legs as they straighten theirs. You are guiding and steadying, not lifting.
- Pause before walking. Let them stand for several seconds. Blood pressure drops on standing, and that pause is when dizziness shows up.
Throughout: keep them close to your body, and never twist. If you need to change direction, move your feet and pivot. Twisting under load is how backs get hurt.
For more on making this specific transfer easier, I’ve written a full article on helping seniors stand up.
Using the Belt While Walking
Walk slightly behind and to their weaker side.
Hold the belt at the back with one hand, underhand. Your other hand stays free, hovering near their shoulder without gripping.
If they use a cane or walker, it goes on their stronger side and you take the weaker one.
Don’t hold the belt so firmly that you’re steering. A belt held too tightly actually disrupts their balance — they end up bracing against you instead of walking.
You want light contact with the ability to tighten instantly.
Match their pace. Don’t walk ahead and pull.
If They Start to Go Down
This is why you’re wearing the belt, and it’s the scenario most caregivers have never thought through.
Do not try to hold them upright. That’s the instinct, and it’s how both of you end up on the floor — often with you underneath.
Instead, control the descent:
- Pull them in close to your body using the belt
- Widen your stance and bend your knees
- Let them slide down along your leg toward the floor
- Protect their head — guide it away from furniture, walls, and corners
- Go down with them if you need to, rather than staying upright and taking their full weight
If a chair or bed is within a step, guide them onto it. If it isn’t, the floor is the correct destination. A controlled slide to the floor is a good outcome.
A caregiver’s herniated disc plus a fall is not.
If a senior loses their balance mildly or missteps while walking, a gait belt can often help you correct their balance and prevent a fall.
But if someone really starts going down or their legs give out on them, gait belt or no belt, it’s unlikely you’ll be able to stop them.
But again, a safe descent to the floor is a success.
Once they’re down, don’t rush to get them up. Work through the checks in my article on how to help an elderly person up after a fall first.
Common Mistakes
| Mistake | Why it matters |
|---|---|
| Belt on bare skin | Chafing and skin tears |
| Belt too loose | Rides up into the ribs, and you lose control |
| Overhand grip | Weaker, worse wrist position, easier to lose |
| Holding the front and pulling | Pulls them off balance instead of supporting |
| Using it to lift dead weight | The belt doesn’t change what one person can safely lift |
| Letting them pull on your neck or arms | Destabilizes you both |
| Twisting instead of pivoting | Most common cause of caregiver back injury |
| Leaving it on between transfers | Uncomfortable, and edges toward restraint use |
Choosing a Gait Belt
Buckle type. Metal loop buckles are traditional and very secure, but they take a little practice to thread. Quick-release plastic buckles are far easier for family caregivers and are what I’d recommend for folks who aren’t confident with buckles. Some facilities require metal, so if you’re supplementing care in a nursing home, ask first.
Handles or no handles. Padded belts with sewn-in handles cost more but are noticeably easier to grip, especially if you have arthritis or weak hands. For a family caregiver doing several transfers a day, they could be worth it (although personally, I prefer no handles).
Length. Standard belts run 54 to 60 inches, which fits most adults with room to spare. Measure at the waist over clothing and add at least 6 inches. Bariatric belts run 72 inches and up.
Material. Nylon wipes clean more easily; cotton is softer against the body. Either is fine.
You can find a basic gait belt here — this is the style I use with all my patients.
Caring for It
Wash it regularly. These get handled constantly and sit against clothing all day. Machine wash warm, air dry.
Check it for wear before each use: fraying at the edges, loose stitching, a buckle that’s cracked or slipping.
Replace it at the first sign of any of these. It’s a $12 item and it’s the only thing between your loved one and the floor.
When a Gait Belt Isn’t Enough
A belt extends what one caregiver can safely do. It doesn’t extend it indefinitely.
Signs you’ve outgrown it:
- They can’t reliably bear weight on their legs
- You’re pulling rather than steadying during most transfers
- Their knees buckle partway up more than occasionally
- You’re sore or straining afterward
- It’s taking two people, or it should be
At that point the answer isn’t better technique — it’s different equipment or more help.
That might mean a transfer board, a sit-to-stand lift, a mechanical lift, or a second person. It might also mean asking their doctor for a physical therapy evaluation, which can be done in the home and is usually covered by Medicare.
If you’re noticing this shift, it’s worth reading about the warning signs of declining mobility and when an elderly parent needs more supervision.
Where This Fits in the Bigger Picture
A gait belt is one tool.
Knowing when and how to use it across the transfers you actually do every day — bed, chair, toilet, tub, car, stairs — is the larger skill.
That’s what I wrote Helping Without Hurting to cover: step-by-step technique for nine common transfers, the 30-second safety check I run before every one, five body-mechanics rules to protect your back, and how to tell when a transfer has become too much for one person.
And if the underlying goal is for your loved one to need less help over time, that’s a strength and balance problem. Our 21-day at-home balance program is built for exactly that.
Final Thoughts
If you remember three things from this article, make them these:
Over clothing. Snug enough for a flat hand. Underhand grip.
That covers most of what goes wrong. The rest is patience, good footing, and being honest with yourself about when a transfer has gotten too big for one person.
FAQ
Where should a gait belt sit on the body? At the natural waistline — above the hip bones and below the ribs, always over clothing. Buckle in front, slightly off to one side.
How tight should a gait belt be? Snug enough that you can just slide your flat hand between the belt and their body. Any tighter restricts breathing; any looser and it rides up under the ribs when you pull.
Should you hold a gait belt overhand or underhand? Underhand, palm up. It’s a stronger grip, keeps your wrist neutral, and lets you support upward rather than pulling backward.
Can one person transfer someone using a gait belt? Only if the person can bear weight and actively participate. A gait belt is a stability aid, not a lifting device — it doesn’t change how much weight one caregiver can safely handle.
When should you not use a gait belt? Avoid it after recent abdominal, back, or chest surgery, and with an aneurysm, hernia, ostomy, feeding tube, rib fractures, fragile skin at the waist, or severe breathing difficulty. Ask their physician or physical therapist if you’re unsure.
What do you do if someone starts to fall while wearing a gait belt? Don’t try to hold them up. Pull them close, widen your stance, bend your knees, and guide them down along your leg to the floor while protecting their head.
This article is for general educational purposes and does not replace individualized assessment or medical advice from a qualified healthcare professional.