
Part of our complete guide to hip replacement recovery.
Search for when you’ll be off the walker and you’ll get answers ranging from a few days to twelve weeks.
That’s not because half of those pages are wrong.
It’s because “when” is the wrong question, and everyone keeps answering it anyway.
Two people have the same operation on the same day. One had an anterior approach, was walking two miles a day beforehand, and lives with a spouse. The other had a posterior approach after three years of limping, lives alone, and has arthritis in the other knee.
They will not be off the walker in the same week, and no calendar can tell you which one you are.
What can tell you is a handful of things you can check yourself, in your kitchen, in about two minutes.
That’s most of what this article is.
There’s a rough timeline below, because it’s genuinely useful to know what typical looks like — but the readiness tests are the part to actually use.
What Typical Looks Like
Here are a few broad ranges, based on what I see out in the field:
| Stage | Common range | What’s happening |
|---|---|---|
| Walker | Day of surgery to 2-3 weeks | Weight-bearing is usually allowed immediately; the walker is for balance, safety, and to protect a healing hip |
| Walker to cane | ~2 to 6 weeks | The widest-varying step, and the one most affected by surgical approach and pre-op status |
| Cane | ~3 to 8 weeks | Often used selectively before being dropped entirely |
| No device | ~6 to 12 weeks | Indoors first, outdoors and uneven ground later |
| Feeling like your own hip | 6-12 months | Strength and confidence keep improving long after the devices are gone |
Six things to affect these ranges:
Your surgical approach — anterior patients are frequently off the walker sooner than posterior and lateral approaches.
How long you limped before surgery — years of limping means years of weakness to rebuild.
Your strength and activity level going in, which matters more than your age.
Whether anything else hurts — a bad knee or the other hip can hold you back regardless of how well the new hip is doing.
Whether you live alone, because being alone sensibly makes people more cautious.
Confidence, which is not a soft factor. Fear of falling changes how people walk, and it’s one of the most common reasons someone stays on a device longer than their body requires.
I don’t think I mentioned this earlier, but pain level is something to consider as well.
Post-op pain level will vary significantly between patients and using an assistive device can help reduce that pain.
As a home health physical therapist, I know I sometimes instruct my patients to use a walker a little longer than they otherwise would to help reduce poorly controlled pain.
After all, we want good quality walking as we progress from a walker to nothing.
Why the Calendar Is the Wrong Tool
Devices don’t get retired on a date – they get retired when you no longer need them, and needing them is measurable.
Here’s the thing to understand about how a walking aid actually works.
A walker or cane does two separate jobs: it takes some load off the leg, and it widens your base of support so you’re harder to tip over.
Early on you need both.
But the load-sharing job usually becomes unnecessary before the balance job does — which is exactly why the cane exists as a middle step, and why people who skip straight from walker to nothing often end up limping.
So the question isn’t “has enough time passed.”
It’s “which of those two jobs do I still need doing.”
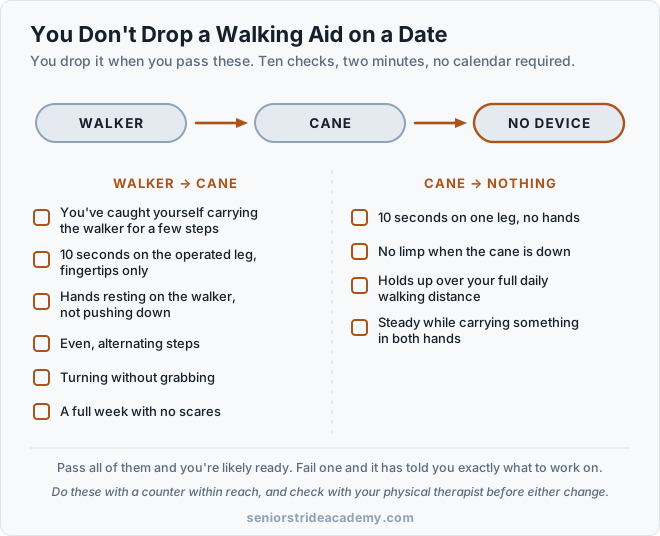
Walker to Cane: Six Checks
Do these with a counter or sturdy chair within reach, and ideally with someone else in the room the first time.
If you haven’t been cleared for independent activity, or you’re less than two weeks out, run this past your PT or surgeon first.
1. The carrying check. Have you caught yourself picking the walker up and carrying it for a few steps as you move around the house? People do this without deciding to, usually when the walker becomes more nuisance than help in a tight spot. It’s worth paying attention to, because it means your body has already worked out that you don’t need it there – and it’s often the earliest sign of all, showing up before you’d have thought to test anything.
2. The one-leg check. Stand at a counter with fingertips resting on it. Lift the non-operated foot off the floor and hold. Ten seconds with fingertips only is a reasonable target. If you’re gripping hard, or you can’t get to ten, you probably still need the walker.
3. The light-hands check. Walk with the walker as normal, and pay attention to your hands. Are you pushing down through your arms, or just resting them there? If you’re bearing real weight through your hands, the walker is doing a job you still need.
4. The even-steps check. Watch your step pattern. Are you stepping past the other foot with each leg, alternating normally? Or are you stepping forward with one and bringing the other up to meet it? A step-to pattern means not yet.
5. The turning check. Turn around in a small space. If turning makes you grab the walker harder, or you feel a wobble, that’s your answer. Turning is when most falls happen.
6. The week check. Have you had a week with no stumbles, no near-misses, and no moments where you were glad the walker was there? One scare resets this.
Pass all six and you’re likely ready to trial a cane. Fail one and it tells you exactly what to work on.
Making the Switch Properly
The cane goes in the hand opposite the operated leg.
This is one of the most common mistakes I see in home health and it’s worth understanding rather than just following.
Holding the cane on the operated side feels intuitive — that’s the side that needs help.
But putting it in the opposite hand actually unloads the weaker hip more, reducing how hard your hip abductors have to work to keep your pelvis level during that step.
Same-side cane does almost none of that.
Don’t believe me? Try it out for yourself and see which cane placement feels easier to walk with.
And remember that the cane and the operated leg move forward together, as a pair – in other words, every time your “bad” leg steps, the cane in the other hand should hit the floor.
Get the height right.
Standing upright in your normal shoes, arms relaxed at your sides, the top of the cane should reach the crease of your wrist.
Your elbow will bend slightly when you hold it. A cane that’s too tall is the usual error and it pushes your shoulder up on every step, which can cause unwanted aches and pains in other places.
A cane (or walker) that’s too high also provides less stability.
The same principle applies to walker height and it’s worth checking you have that set correctly too.
Don’t throw the walker out.
Overlap them for a week or two — cane indoors where you know the floor, walker for longer distances or when you’re tired.
Fatigue is when the pattern falls apart, and it’s a bad time to have downgraded your support.
Most of my patients will start using a cane during the day, while they’re at their freshest, but still use the walker at night, when falls are more likely to occur.
This is normal and encouraged, so don’t feel that once you start using a cane, you can’t still use your walker when you need it.
If you need to buy a cane rather than being issued one, here’s where to look.
Cane to Nothing: Four Checks
Harder than the first transition, and the one people want to rush.
1. The one-leg check again, unsupported. Same test, but hands off the counter, ten seconds each side. Compare the two sides honestly — a clear difference means the operated side isn’t ready.
2. The limp check. Walk twenty feet without the cane while someone watches, or film it. If a limp appears the moment the cane is gone, the cane is masking a weakness rather than compensating for a healing joint. That’s a strength problem, and dropping the cane won’t fix it — it’ll rehearse it.
3. The distance check. Can you walk your normal daily distance without the limp appearing near the end? Most people can manage twenty feet cleanly. The test is whether it holds up at two hundred.
4. The full-hands check. Walk while carrying something in both hands — a laundry basket, two mugs. If you feel unstable, you were relying on the cane more than you realized.
An objective marker worth adding: measure your walking speed at home with and without the cane.
If you’re noticeably slower without it, you’re not ready. It’s a more honest test than how it feels, because feeling improves before function does.
Nobody Goes Straight From Cane to Nothing
This is the part that isn’t in the handouts, and it takes the pressure off.
Almost nobody wakes up one morning and never touches the cane again.
What actually happens is a staged retreat:
Cane everywhere → cane outdoors, nothing indoors → cane for long distances, crowds, and uneven ground → cane in the car for emergencies → cane in the closet
That progression can take months, and taking the cane to a busy supermarket while walking unaided at home isn’t a failure.
It’s a sensible reading of two different environments.
The one thing to watch is that “cane for outdoors” doesn’t quietly become permanent through habit rather than need.
Re-run the four checks every couple of weeks.
If you’re passing them and still reaching for it, the remaining barrier is confidence, and that’s worth naming rather than working around.
The Two Ways This Goes Wrong
Letting go too early. Most common in the patients I see. Without adequate support you’ll compensate — leaning, shortening your step, swinging the leg out, limping. Your nervous system practices whatever you do, so a few weeks of that builds a walking pattern you’ll then have to unlearn. And there’s the fall risk, which at this stage can mean a dislocation.
Holding on too long. The comfortable failure and a less dangerous one. A device you don’t need offloads the operated side, and muscles that don’t get loaded don’t get stronger. That entrenches the exact weakness keeping you on the device. This is one of the more common reasons people are still limping at six months with a technically perfect hip.
The checks above exist to keep you out of both.
If You’re Behind the Timeline
First, be sure you actually are. The ranges above are wide for a reason and being at week eight on a cane when a website said six weeks is well within normal.
That said, some things are worth acting on rather than waiting out.
Ask for more physical therapy. Discharge from rehab is usually driven by insurance authorization and functional milestones, not by whether your walking is fully restored. A persistent problem is a legitimate reason to request more visits. If more PT is out of the picture, check out these exercises you can do from home after a hip replacement.
Check whether it’s strength or confidence. They need different work, and people frequently misdiagnose their own. If you pass the physical checks but still won’t let go of the cane, that’s fear, and it responds to graded practice rather than more exercises.
Do the strength work. Precautions ending isn’t the same as being ready – the restrictions lift long before the muscle comes back, and the abductors in particular can take a year or more. Here’s what actually rebuilds it.
Make sure your precautions aren’t the limiting factor. If you’re still under posterior restrictions, some of the strengthening work is off the table until they lift. Worth confirming what yours are and how long they last.
When to Call Your Surgeon
Progress that stalls is usually a rehab issue. Progress that reverses is not.
Contact your surgeon promptly for:
- A device you’d stopped needing that you suddenly need again
- Pain that is worsening rather than gradually easing, especially in the groin or thigh with weight-bearing
- A pop, clunk, or sensation of the hip shifting or giving way
- Fever, chills, or redness, warmth, or drainage at the incision
- New numbness, tingling, or weakness in the leg or foot
- Calf pain, swelling, or tenderness on one side
- A fall, even one that seemed minor at the time
Frequently Asked Questions
How long will I need a walker after hip replacement? Commonly 2-3 weeks, though it varies widely with surgical approach and how strong you were beforehand. Anterior patients are often off it fastest. Use the six checks above rather than a target date.
When can I switch from a walker to a cane? When you start carrying your walker, can hold a ten-second single-leg stand with fingertip support, aren’t pushing weight through your hands, are stepping evenly, can turn without grabbing, and have had a full week without a scare. That happens for most people somewhere between two and six weeks.
Which hand does the cane go in? The hand opposite your operated leg. This is counterintuitive and gotten wrong constantly. The opposite hand reduces the demand on your hip abductors; the same-side hand placement doesn’t help nearly as much.
How long until I walk without anything? Most people are walking unaided indoors somewhere between six and twelve weeks, and outdoors on uneven ground later than that. Expect a staged retreat rather than a single day.
Is it bad that I still need my cane outdoors? No. Different environments have different demands, and using a cane in a crowd while walking freely at home is a reasonable judgment rather than a setback. Just re-check every couple of weeks that it’s still need rather than habit.
Why do I limp when I put the cane down? Usually weak hip abductors, sometimes an old walking habit left over from before surgery, and often both. Neither resolves by waiting, and neither is fixed by dropping the cane and pushing through.
My precautions were lifted but I still need a cane. Is that normal? Yes, and it’s one of the more common sources of confusion. Precautions protect healing tissue; the cane compensates for strength and balance. Those two things end on completely different schedules.
This article is educational and is not a substitute for individual assessment. Progressing or discontinuing a walking aid is a decision worth making with a physical therapist who can watch you walk, particularly if you live alone or have had a fall. Your surgeon’s instructions take priority over anything here. Report worsening pain, fever, a fall, or any sensation that the hip has shifted promptly.