
Part of our complete guide to hip replacement recovery.
Most people come home from hip replacement surgery with a sheet of exercises: ankle pumps, quad sets, maybe a heel slide.
Those are the right exercises for that week.
The trouble is that plenty of people are still doing them in month three – same movements, same reps, long after they stopped asking anything of the leg.
Nobody tells you when to change them, or what to change them to.
If you continued physical therapy long enough to progress past these, that’s great, but I know this isn’t the case for a lot of folks out there.
That’s where this guide comes in.
Here, we’ll go over some effective exercises you can perform throughout the different phases of healing after a hip replacement.
And we’ll include the thing the exercise lists always leave out: how to tell when you’re ready for the next set.
Before anything else. Every phase below assumes your surgeon or physical therapist has cleared you for that level of activity. That clearance is not the same as reaching a milestone on your own — you can be walking with a cane and still not be cleared for side-lying work, particularly after a lateral approach. Ask specifically, and ask again as you progress.
Why These Phases Are Organized by Your Walking Aid
Most guides phase exercises by week. Weeks two to six, six to twelve, and so on.
The problem is that people don’t recover on the same schedule, so a calendar tells you what an average person is doing rather than what you should be doing.
The rehab protocols therapists actually use don’t work that way either. They progress patients on criteria — can you transfer independently, can you walk a hundred feet with your device, can you manage five hundred feet without one. One posterior protocol states outright that there’s no mandatory time frame for assistive device use, and that weaning depends on gait pattern, fall risk, muscle performance, and how apprehensive the patient is.
So this guide uses the thing you already know about yourself: what you’re leaning on to get across the room.
| Phase | Where you are | What the work is for |
|---|---|---|
| 0 | First week, mostly sitting and lying down | Circulation and waking the muscle up |
| 1 | Walking with a walker | Tolerating weight through the leg |
| 2 | Walking with a cane | Real loading begins |
| 3 | Walking without a device | Progressive load and gait retraining |
| 4 | Months three to twelve | Maintenance, and finishing the job |
If you’re unsure which phase you’re in, or whether you should still be on the device you’re using, the readiness checks here will tell you.
What Your Precautions Rule Out
This is the part that makes hip replacement different from general leg strengthening, and it’s why a generic exercise list can be actively unhelpful.
Under posterior precautions, several standard exercises are off the table: anything bending the hip past 90 degrees, anything bringing the operated leg across the midline, and anything rotating the toes inward. That rules out deep heel slides, seated knee-to-chest work, step-ups onto anything tall enough to break 90, and most crossed-leg stretching.
Under anterior precautions, when they’re given at all, the restricted combination is usually extension with the toes turned out. Backward lunges and aggressive hip extension work come later.
After a lateral approach, part of the gluteus medius was detached and repaired — which means the abductor exercises that are the whole point of phases 2 and 3 may be specifically restricted early on. This is the most frustrating version, because the muscle that most needs the work is the one that has to wait.
More on which restrictions apply to which approach.
These days, we aren’t seeing nearly as many post-op precautions from surgeons as we used to, but we still see them from time to time and must always obey.
In the case of lateral approaches, we often see a precaution of no active hip abduction for 4 weeks, or something close to that.
In these cases, I may focus more on mobility and walking, but may be able to substitute some isometric work that gently gets the muscles turning on a little, without violating the post-op precautions.
When in doubt about an exercise, always consult your physical therapist or surgeon’s office for guidance.
Phase 0: The First Week
You are mostly in a chair or in bed. You will be walking short distances, but exercise at this stage isn’t strength work and shouldn’t feel like it.
What it’s for: keeping blood moving, preventing clots, and reminding muscles that were switched off by surgery that they still have a job.
| Exercise | How | Dose |
|---|---|---|
| Ankle pumps | Point and flex the foot | 10–20, every hour you’re awake |
| Quad sets | Press the back of the knee down into the bed, hold | 10 × 5 seconds, 3× daily |
| Glute sets | Squeeze the buttocks together, hold | 10 × 5 seconds, 3× daily |
| Heel slides | Slide the heel toward you, stopping well short of 90 degrees | 10, 2–3× daily |
| Sit-stand transfers | Stand up from a chair, get your balance, and sit back down. | 5, 2–3× daily |
The first three do nothing you can see and matter more than they look. Muscle shuts down after surgery, and getting it firing again is what makes the standing work possible later.
These exercises also help with circulation and controlling swelling post-op (especially if doing the ankle pumps with your leg elevated).
I didn’t list it as an exercise in the above table, but getting up and simply walking with your walker every hour or so during the day is the best exercise you can do in this phase.
Putting weight through that leg is going to tell those muscles to start waking up and the act of walking is going to get everything moving the way we want it to.
As a home health therapist, I usually see patients 1-2 days after surgery and I review the above exercises with them, but I always stress the importance of getting up and walking.
Plus, sitting for extended periods during the day is going to be uncomfortable anyway – movement is your friend after a hip replacement.
Ready for phase 1 when: you’re getting in and out of a chair without help, you can walk to the bathroom with your walker, and your pain is controlled enough to move without dreading it.
Phase 1: On the Walker
Usually the first few weeks. Both hands are on something.
What it’s for: getting comfortable putting weight through the new hip, and rebuilding the standing pattern.
| Exercise | How | Dose |
|---|---|---|
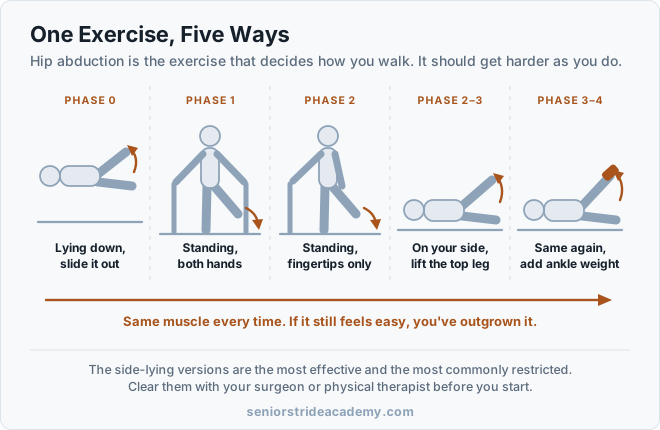
| Standing hip abduction | Both hands on the counter, lift the leg out to the side. Torso stays upright | 10 each side, 3× daily |
| Standing hip extension | Both hands supported, take the leg straight back. Small range | 10 each side, 3× daily |
| Standing marching | Lift the knee, not past hip height | 10 each side, 3× daily |
| Heel raises | Both hands on the counter, rise onto the toes | 10–15, 3× daily |
The two most common mistakes here. Leaning your torso away from the leg during standing abduction – which makes it look like the leg is going higher while doing less. And lifting the marching knee too high, which is a precaution problem, not just a form problem.
Frequent and short beats long and occasional at this stage – remember, movement is your friend during recovery.
Five minutes six times a day is better than thirty minutes once.
Ready for phase 2 when: you’re passing the walker-to-cane checks — including holding a single-leg stand for ten seconds with fingertip support.
Phase 2: On the Cane
This is where it stops being movement and starts being training.
What it’s for: loading the hip abductors properly for the first time. This is the phase that decides whether you walk normally later.
| Exercise | How | Dose |
|---|---|---|
| Single-leg stance | Fingertips on the counter, build toward 30 seconds | 3 × 20–30 sec each side, daily |
| Standing abduction, 1 hand | 1 hand on counter, progress to fingertips only | 3 × 10 each side |
| Sit to stand, no hands | Arms folded across the chest | 3 × 5 – 10 |
| Mini squats | Hands on the counter, small range only | 3 × 10 |
| Step-ups | A 4–6 inch step. Watch the knee doesn’t cave inward | 3 × 10 each side |
| Lateral stepping | Sideways along a counter, band optional | 10 each direction, 3 sets |
| Side-lying abduction | Precaution-dependent — clear this specifically | 3 × 10 each side |
Side-lying leg raises are the single best abductor exercise here and also the one most likely to be restricted. Don’t assume. Ask.
On resistance bands. This is the phase where a set of loop bands earns its money, and it’s the cheapest thing you’ll buy in the whole recovery. What’s worth having.
Ready for phase 3 when: you can hold a single-leg stand for ten seconds with no hands, and no limp appears in the first twenty feet when you put the cane down.
Phase 3: Off the Device
Roughly two to three months for most people, though the range is wide.
What it’s for: two separate jobs that most people only do one of — adding load, and retraining how you walk.
The strength half
| Exercise | Progression |
|---|---|
| Side-lying abduction | Add 1–3 lb ankle weights once 3 × 10 is easy |
| Standing abduction | Heavier band, or ankle weights |
| Step-ups | Raise the step height, then add a hand weight |
| Step-downs | Slow and controlled — harder than step-ups and better for knee control |
| Single-leg stance | Build toward 30 seconds, then eyes closed with support nearby |
| Sit to stand | From a lower chair, or one leg lighter than the other |
The target worth aiming at: thirty seconds of single-leg stance with no hand support and no hip drop. That’s more demanding than the ten-second check that let you drop the cane, and it’s roughly where the abductors are genuinely doing their job rather than just about coping.
The gait half
Strength alone doesn’t remove a limp, because the walking pattern you built up over years of a painful hip is still sitting in your nervous system.
Mirror walking. Walk toward a full-length mirror with one instruction: keep the hips level.
Equal-time walking. Walk deliberately slowly, spending the same amount of time on each leg. Slowing down removes the momentum you’d otherwise use to hurry past the weak side.
Counted steps. Count one-two, one-two aloud. Uneven timing becomes audible.
Long-corridor walking. Find the longest uninterrupted stretch you can and use the cue heel first, push back.
Do these when you’re fresh. Gait practice at the end of a tiring day rehearses the compensation rather than the correction.
Phase 4: Months Three to Twelve
The devices are gone and the formal rehab has usually ended. This is where most people stop, and it’s the reason some are still limping at six months.
Hip abductor strength after this surgery keeps improving and often doesn’t fully return to normal. Stopping at month three leaves the job unfinished.
What to keep doing: the phase 3 strength work, two or three times a week, indefinitely. Progressive — heavier band, more weight, higher step. Not the same three sets you were doing in month two.
What to add: whatever you actually want to do. Walking distance, cycling, swimming, golf, hiking. Specific activity beats general exercise once the foundation is there.
Track something. Single-leg stance time, step-up height, or how many sit-to-stands you manage without hands. Progress at this stage is too slow for memory to judge honestly.
If you want the strength work structured rather than assembled yourself, Strong & Steady: Strength is a 28-day home program built around this kind of loading.
If the limp hasn’t gone by six months, that’s not something to keep waiting out. It’s usually abductor weakness, an unbroken pre-surgical habit, or both — and there’s a way to work out which.
Stop and Call Your Surgeon If
Exercise soreness is normal. These are not.
- Sharp or increasing pain during or after an exercise, particularly in the groin
- A pop, clunk, or feeling that the hip shifted
- New swelling in the thigh or calf, especially one-sided
- Fever, chills, or redness, warmth, or drainage at the incision
- New numbness, tingling, or weakness in the leg or foot
- Pain that wakes you at night
Muscle soreness a day after new exercise is expected. Joint pain that builds session over session is not — back off and ask.
Frequently Asked Questions
How soon can I start exercising after hip replacement? Usually the same day, in the form of ankle pumps, muscle sets, and walking. Actual strengthening comes a little later and in stages. Your surgeon or PT decides when.
Which exercise matters most after hip replacement? Hip abduction — lifting the leg out to the side, standing or side-lying. Those muscles hold your pelvis level with every step, they’re weak before surgery and disrupted by it, and they’re the usual reason for a lingering limp.
How often should I do these? Early phases: short and frequent, several times a day. Later phases: three or four times a week, harder each time. The pattern flips as you progress.
Can I do side-lying leg raises after hip replacement? Only once cleared. It’s the best abductor exercise on this page and one of the most commonly restricted, particularly after posterior or lateral approaches. Ask specifically rather than assuming.
How long until I’m back to normal strength? Longer than most people are told. Abductor strength keeps improving for up to two years and may not fully return to pre-arthritis levels. Most of the visible progress happens in the first six months, but stopping there leaves strength on the table.
I finished physical therapy. Should I still be doing this? Yes. Discharge from rehab is usually driven by insurance authorization and functional milestones, not by whether your strength has recovered. Keep going, and ask for a referral back if you’re stuck.
My exercises hurt. Should I push through? Muscle soreness, yes. Joint pain, no. Sharp pain in the groin during an exercise means stop and ask.
This article is educational and is not a substitute for individual assessment. Do not begin new exercises after joint replacement surgery without clearance from your surgeon or physical therapist — the appropriate progression depends on your surgical approach, your precautions, and how your repair was done. Report worsening pain, fever, or any sensation that the hip has shifted promptly.