
Part of our complete guide to hip replacement recovery.
Most home prep checklists for hip replacement tell you to remove throw rugs, freeze some meals, and buy a grab bar.
All of that is fine, and none of it is the actual problem.
The actual problem is that for the first six to twelve weeks after surgery, there’s a good chance you won’t be allowed to bend your hip past ninety degrees.
And even if you were allowed, odds are you wouldn’t be able to anyway – pain, tightness, and weakness have that effect.
And guess what: a lot of surfaces in your house are too low for that rule.
Your toilet is too low.
Your sofa is definitely too low.
Your bed might be too high or too low, and you can’t tell by looking.
So, the useful way to prepare your home isn’t to buy a list of products – it’s to walk around with a tape measure, find out which surfaces are going to be a problem, and fix those specific ones.
That takes an afternoon, and it’s the difference between a smooth transition home and a miserable one.
First: Find Out If the Rule Even Applies to You
Before you buy anything, get your precautions in writing.
Ask your surgeon’s office directly: what are my hip precautions, and how long do they last?
Posterior approach – usually means no bending past ninety degrees, no crossing the operated leg past the midline, and no turning the toes inward. This is the one that drives most of the shopping on this page.
Anterior approach – often comes with far fewer restrictions, and some surgeons now use none at all. Others restrict extension and external rotation instead, which is a different set of problems.
Lateral approach – varies, and frequently includes limits on actively lifting the leg out to the side.
In my area where I treat patients, we see a lot more anterior approaches now than anything else.
Posterior approaches were once the norm, but I’d say, at least around me, there are a lot more anterior hips being performed.
Which is great, because patients with anterior hip replacements tend to recover faster with fewer precautions post-op.
That said, regardless of which type of surgery you have, I guarantee you will have some limitations in your hip mobility and strength as you arrive back home.
That’s just the cost of getting a brand new hip.
And if you can’t get a clear answer regarding the approach before surgery, prepare as though you have posterior precautions.
Everything on this page is useful even if the restrictions turn out to be looser, and none of it is wasted money — most of it stays useful long after the hip has healed.
The One Measurement That Decides Most of Your Shopping
Stand up, in flat shoes.
Have someone measure from the floor to the crease at the back of your knee (you can also measure this while seated in a chair).
That number — physical therapists call it your popliteal height — is roughly the seat height you need on everything you sit on.
For most adults it lands somewhere between 15 and 20 in (38–51 cm), and taller people with long femurs need more than they expect.
Write it on a sticky note and take it around the house with you.
The formula for anything you sit on:
Your popliteal height − the surface’s current height = how much you need to add.
That’s it.
That single number turns a vague instruction like “your hips should be higher than your knees” into a shopping decision you can actually make.
One caution: higher is not automatically better.
If a seat is so tall that your feet dangle, you’ve traded a hip problem for a balance problem, and standing up from it becomes genuinely unsafe.
Aim for your popliteal height, or an inch or two above it — not five.
The Seat Height Audit
Take the tape measure around the house before surgery, not after.
Measure to the top of the seating surface, with any cushion compressed the way it is when you actually sit on it.
| Surface | Typical height | What to do if it’s too low |
|---|---|---|
| Toilet | 15–16 in (38–41 cm) with seat | Raised seat, safety frame, or 3-in-1 commode |
| Dining chair | 17–19 in (43–48 cm) | Usually fine — often your best chair in the house |
| Sofa | 15–18 in (38–46 cm), and it sinks | Firm cushion on top, or don’t use it for a while |
| Recliner | Varies wildly | Measure it; usually fine and being able to elevate legs comes in handy |
| Bed | 20–25 in (51–64 cm) | Usually too high, not too low. See below |
| Shower seat | Adjustable on most | Set it before surgery, not while wet |
| Car seat | 18–22 in (46–56 cm) | A firm cushion, and practice the transfer |
The sofa is the one that catches most people after surgery.
It measures fine empty, then you sit down and sink four inches into it, and now you’re below your knees with nothing to push off.
If your sofa is where you spend your evenings, put a firm cushion on it and test it before surgery.
That’s also the honest answer to “what chair should I use?” — the one you can get out of without help, which is usually a dining chair with arms, not the comfortable one.
The Bathroom
This is where most of the money goes, and where the height rule bites hardest.
The raised toilet seat is the single most important purchase.
Measure the top of your existing toilet seat, subtract from your popliteal height, and buy that much lift.
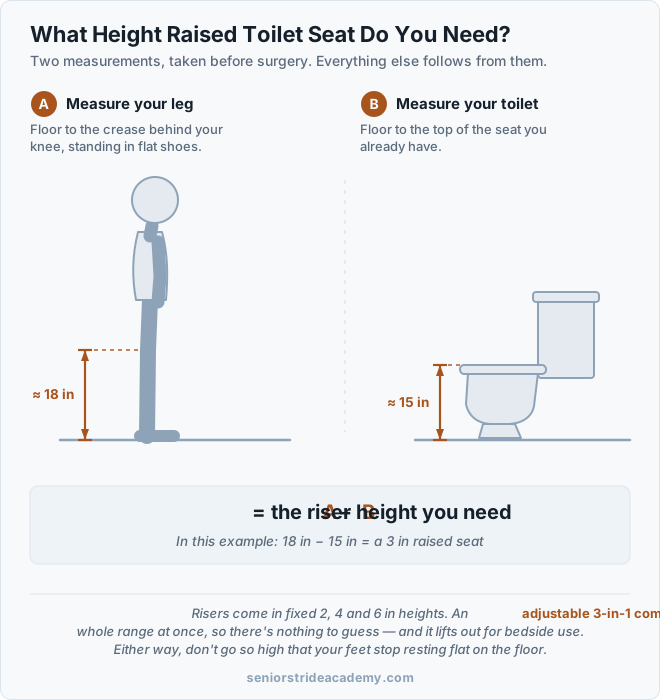
Risers commonly come in 2, 4, and 6 in (5, 10, and 15 cm) heights.
Standard American toilets sit at about 15 in with the seat on, so most people need somewhere between 2 and 5 in of lift.
Note that “comfort height” toilets already sit at 17–19 in (43–48 cm), which may put you close enough that you only need a small riser — or none at all.
Two fit details that cause returns: your bowl is either round or elongated, and risers are sold for each, so check before ordering.
And if you’re between sizes or want the option to adjust, an adjustable raised seat beats a fixed one.
If you’d rather have handles than height, a toilet safety frame gives you something to push up from without changing the seat height at all — which only works if your toilet is already tall enough.
For my patients though, I almost always recommend the 3-in-1 commode.
It adjusts for height, has handles built in, sits over your existing toilet, and lifts out to work as a bedside commode during the first week or two when a night-time trip down the hallway is the worst idea in the house.
That last function is the one people are grateful for and rarely think to buy in advance.
Grab bars, a shower seat, a handheld shower head, and non-slip matting all matter here too, but they’re general bathroom safety rather than hip-specific, and we’ve covered choosing them properly in 8 bathroom safety products for seniors and where to install grab bars.
Two hip-specific notes on top of that guidance.
Get the grab bars installed into studs before surgery — not the week after, when you need them and the handyman can’t come until Thursday.
Suction-cup bars are not grab bars.
And if you’re deciding between a shower chair and a tub bench, the tub bench wins for hip precautions, because it lets you sit down outside the tub and slide across rather than lifting a leg over the wall. Lifting a leg over a tub wall is close to several restricted movements at once.
Getting Dressed: The Section Other Checklists Skip
This is the most hip-specific equipment on the page, and it’s cheap.
Putting on socks, shoes, and underwear all require bending toward your feet.
Under a ninety-degree restriction, you can’t.
For roughly six weeks, you either use tools or you need another person to dress you every morning.
A reacher/grabber, ideally two — one upstairs, one downstairs. Picks things off the floor, pulls up trousers and underwear, retrieves what you drop (you will drop things).
A sock aid. Looks strange, works well, and is the single item patients are most surprised by. Practice with it before surgery, because learning it while sore and stiff is miserable.
A long-handled shoehorn, 18–24 in, makes getting those hard to reach shoes on much easier.
A long-handled sponge for washing your lower legs and feet.
Elastic or no-tie shoelaces, or slip-on shoes with a firm back. Not backless slippers — those are a fall risk with a walker.
Many of these are sold together as a “hip kit” for less than buying them separately, which is worth checking.
A lot of seniors may already have a grabber and a shoehorn, but the no-tie shoelaces (or easy slip-on shoes) and a sock aid are game changers after a hip replacement.
Getting socks and shoes on after a hip replacement is frustratingly challenging for the first 6 weeks or so.
The Bedroom
Bed height matters in both directions.
Too low and you can’t stand up without breaking the ninety-degree rule.
Too high and it’s hard to get your hips far enough back on the edge to sit and slide in.
The goal is to sit on the edge with your feet flat on the floor and your hips level with or above your knees — the same rule as everywhere else.
Raise a low bed with furniture risers under the legs.
Lowering a bed can be harder, but sometimes you can remove the box springs to find the correct height.
If possible, it’s a good idea to sleep downstairs if your bedroom is upstairs.
Not forever — most people manage stairs sooner than they expect — but set up a ground-floor sleeping space before surgery so the option exists on day one.
A leg lifter helps you get the operated leg onto the bed without bending or twisting (they also work well for getting that leg in/out of a car). A bathrobe belt or a long towel does the same job for free.
A firm pillow between the knees when side-lying keeps the leg from crossing the midline. Your surgeon may specify an abduction pillow instead, so ask.
A night light and a clear path to the bathroom. Most falls in the first fortnight happen on a nighttime bathroom trip in the dark.
The Living Room and Your Recovery Station
Pick a chair and make it your chair.
Firm, with arms, tall enough by your measurement, and against a wall or in a corner so it can’t slide.
Then build a station within arm’s reach of it: phone and charger, water, medications, remote, tissues, reading glasses, a notepad for tracking, and the phone number for your surgeon’s office written down rather than only in your phone.
You’ll also want to make sure you have an easy way to ice your hip after surgery.
Some surgeons send patients home with ice packs or automated icing machines, but I prefer large gel ice packs because they cover more area, are conforming, and easy to throw back in the freezer.
Floors, Doorways, and Pathways
Walk your normal routes — bed to bathroom, bedroom to kitchen, front door to chair — pushing a walker if you already have one, or a kitchen chair if you don’t.
You need about 30 in of clear width for a walker, and more at turns.
Remove throw rugs entirely. Not taped down, not tucked — removed and put in a closet. They’re the single most common trip hazard in a home health caseload.
Tape or reroute cords out of walking paths.
Move what you use daily to waist height. Nothing you need every day should live below your knees or above your shoulders for the next six weeks. That includes the kitchen, the bathroom cabinet, and your wardrobe.
Check the route from the car to the front door. People plan the inside of the house thoroughly and forget that they have to get up the front steps first, on day one, tired and sore.
If there are steps with no rail, that’s a high-priority fix.
What You Probably Don’t Need
A hospital bed. Rarely necessary for an uncomplicated hip replacement, and it takes up an enormous amount of space.
A wheelchair. Most people are walking with a walker within hours of surgery. Buy one only if your surgeon says so.
A walk-in tub. A genuinely useful product for the right person, and far too big a project to rush through in the four weeks before a scheduled surgery.
Suction-cup grab bars. Worth repeating because I’ve seen way too many patients fall because they relied on an unreliable grab bar.
Lots of new furniture. A cushion on the chair you already own solves most of this.
A Timeline That Works Backwards From Your Surgery Date
Four weeks out. Get your precautions in writing. Take your popliteal measurement and do the seat height audit. Order anything that needs shipping. Book the handyman for grab bars and any stair rail work.
Two weeks out. Install everything and use it while you’re still able-bodied. Sit on the raised toilet seat. Practice with the sock aid. Try the shower bench. This is the step people skip, and it’s the one that catches the ordering mistakes while there’s still time to fix them.
One week out. Cook and freeze meals. Do the laundry. Fill prescriptions. Move everything to waist height. Remove the rugs.
Two days out. Clear the pathways. Charge everything. Set up the recovery station. Confirm who is driving you home and who is staying the first few nights.
That last one isn’t equipment, and it matters more than any of the equipment.
Almost everyone needs someone in the house for the first several days, and arranging it two days before surgery is how people end up alone.
What Comes Next
Once you’re home and moving, the questions change from how do I sit down to how do I get walking properly again.
Worth reading when you get there: the equipment that actually rebuilds your strength once you’re cleared to exercise.
If You Do Only Two Things
Measure first. Your popliteal height decides most of what’s on this page, and it takes thirty seconds.
Then buy the two things you’ll use from the first day home: a height-adjustable 3-in-1 commode, and a hip kit so you can get dressed without bending.
Everything else here is worth doing. These two are the ones patients tell me they wish they’d had waiting for them.
Order about four weeks out. That leaves time to set everything up, practice with it, and send back anything that turns out to be the wrong size.
Frequently Asked Questions
How high should my toilet seat be after hip replacement? Roughly your popliteal height — measure from the floor to the crease behind your knee while standing in flat shoes. Subtract your existing toilet seat height from that number, and the difference is the riser you need. Most people land between 2 and 5 in.
How long will I need the raised toilet seat? Usually six to twelve weeks, matching how long your precautions last. Don’t go back to a standard seat until your surgeon clears it.
Do I need all this if I’m having an anterior approach? Possibly not. Anterior patients often come home with minimal restrictions. But approaches vary by surgeon, and it’s worth asking rather than assuming — and the raised toilet seat is helpful in the first few weeks for comfort and strength reasons, even without a formal precaution.
What’s the one thing to buy if I can only buy one? A raised toilet seat or 3-in-1 commode. You’ll use it several times a day from the first day home.
Should I buy a walker before surgery? Usually you’ll be issued one, and it’s often covered. Ask your surgeon’s office rather than buying in advance. If you do end up buying, here’s where to look, and it’s worth learning how to set it up correctly beforehand.
Can I use my HSA or FSA for this equipment? Frequently, yes. Raised toilet seats, commodes, shower seats, and grab bars are commonly eligible, sometimes with a letter of medical necessity. Check with your plan administrator before you buy.
When can I go back to normal furniture? When your surgeon lifts your precautions, typically somewhere between six and twelve weeks. Some people keep the raised toilet seat permanently because they simply prefer it.
This article is educational and is not a substitute for individual assessment. Your surgeon’s precautions take priority over any general guidance here. Ask your surgical team or a physical therapist about your specific restrictions, and report worsening pain, fever, or a feeling of instability to your surgeon promptly.