
Part of our complete guide to hip replacement recovery.
Most “best equipment after hip replacement” articles are cardio articles.
They list bikes, ellipticals, and treadmills, tell you low-impact is good, and stop there.
That’s not wrong, but it leaves out the part that actually determines how you’re walking a year from now – strength.
Research has shown that deficits in hip range of motion, abductor strength, and balance are still common up to 5 years after a hip replacement.
5 years.
A cardio machine keeps your heart and lungs in shape, improves range of motion, and gets you moving in ways walking can’t – all important things.
But it’s rarely the best way to strengthen important walking muscles.
The equipment that changes how you really walk costs about sixty dollars and fits in a drawer.
So this page covers both halves, in the order that matters.
Before You Buy Anything: The Two Things That Decide What’s Safe
Nothing on this page applies to you until you know these two.
Your surgical approach and your precautions.
A posterior approach usually comes with restrictions on bending the hip past about 90 degrees, crossing the operated leg past the midline, and turning the toes inward.
An anterior approach usually restricts different movements — often extension and external rotation — and typically has fewer limits on deep flexion.
A lateral approach cuts or detaches part of the abductor group, which matters enormously for the strength half of this article.
Surgeons vary, and some no longer use formal precautions at all.
Your discharge paperwork is the authority here, not a website.
How far out from surgery you are.
| Time since surgery | What’s realistic to buy and use |
|---|---|
| 0–2 weeks | Nothing new. Your walker, your home exercise sheet, and rest |
| 2–6 weeks | Seated, zero-impact cardio if your surgeon clears it. Light bands |
| 6–12 weeks | Seated cardio with real resistance. Standing strength work as precautions lift |
| 3–6 months | Upright bike, step, loaded strength work, gait retraining |
| 6+ months | Essentially anything you’re cleared for, including impact if you want it |
The above guidelines are vague because so much varies on your specific surgeon’s precautions and protocols.
In my area, we see a lot of anterior hip replacements that come home with very few precautions to begin with – in many cases, nothing more than “no forceful movements”.
Others still have specifics regarding avoiding active hip abduction for certain time frames and so forth.
So, if you’re still within 3 months of surgery, you must clear any exercise equipment with your surgeon or physical therapist before buying.
If you’re buying before surgery so it’s waiting for you at home, that’s a reasonable thing to do — just don’t let a machine in the living room become pressure to start before you’re cleared.
| If you’re… | Start here | Roughly |
|---|---|---|
| Any phase, any budget | Bands, ankle weights | Under $100 |
| Six weeks out, want one machine | Teeter FreeStep LT3 | $999 |
| Same, on the tightest budget | Teeter FreeStep LT1 | $799 |
| Looking for commercial quality | NuStep T4r or Spirit CRS800S | $4,000+ |
| Past precautions, want to spend less | Spirit XBR25 recumbent bike | ~$1,200–1,500 |
| Past month four, steady on your feet | Sole E25 elliptical | ~$1,300 |
What Actually Matters in a Machine After This Surgery
Five things – screens and workout programs are not among them.
1. How far your hip bends at the top of the stroke.
This is the one nobody explains, and it’s the whole ballgame in the first few months.
On an upright stationary bike set at a normal seat height, your knee may come up above your hip crease at the top of every pedal revolution.
And if you’re under posterior precautions, that’s a violation of the 90-degree rule roughly sixty times a minute.
It’s fixable — you raise the seat well above where a healthy rider would put it, so the thigh stays below parallel at the top of the stroke, then lower it gradually as the restriction lifts.
But it has to be set deliberately, by someone who knows to check, and most people don’t know to check.
A machine with a horizontal stride and a reclined seat sidesteps the problem, because the leg pushes forward and back rather than cycling up toward the chest.
2. How you get on and off it.
The transfer is the riskiest thirty seconds of the session.
You want a step-through frame with nothing to swing a leg over, a stable seat that won’t slide, and ideally a way to lock the pedals so they don’t move while you’re loading weight onto them.
One detail that gets glossed over in every spec sheet: “step-through frame” is a marketing phrase, not a measurement.
Some consumer bikes advertise a step-through design and give you an opening of about 4 in (10 cm) between the seat rail and the frame.
That’s fine if you’re steady on your feet and it’s a real problem if you’re not, which is why rehab-grade machines make the opening wide enough to walk through or swing a wheelchair alongside.
3. Whether it fits your body.
Check the manufacturer’s stated height range and weight capacity before anything else.
This is where people waste money.
4. Footprint.
Measure the room, then add clearance to get on and off from the side.
After all, if it doesn’t fit in your home, it’ll be impossible to use.
5. Noise.
Not a safety issue, but an honest reason a lot of home equipment goes unused or abandoned.
A machine quiet enough to use during a TV show usually gets used a lot more than a clunky noise machine.
The Cardio Pick: Teeter FreeStep Recumbent Cross Trainer
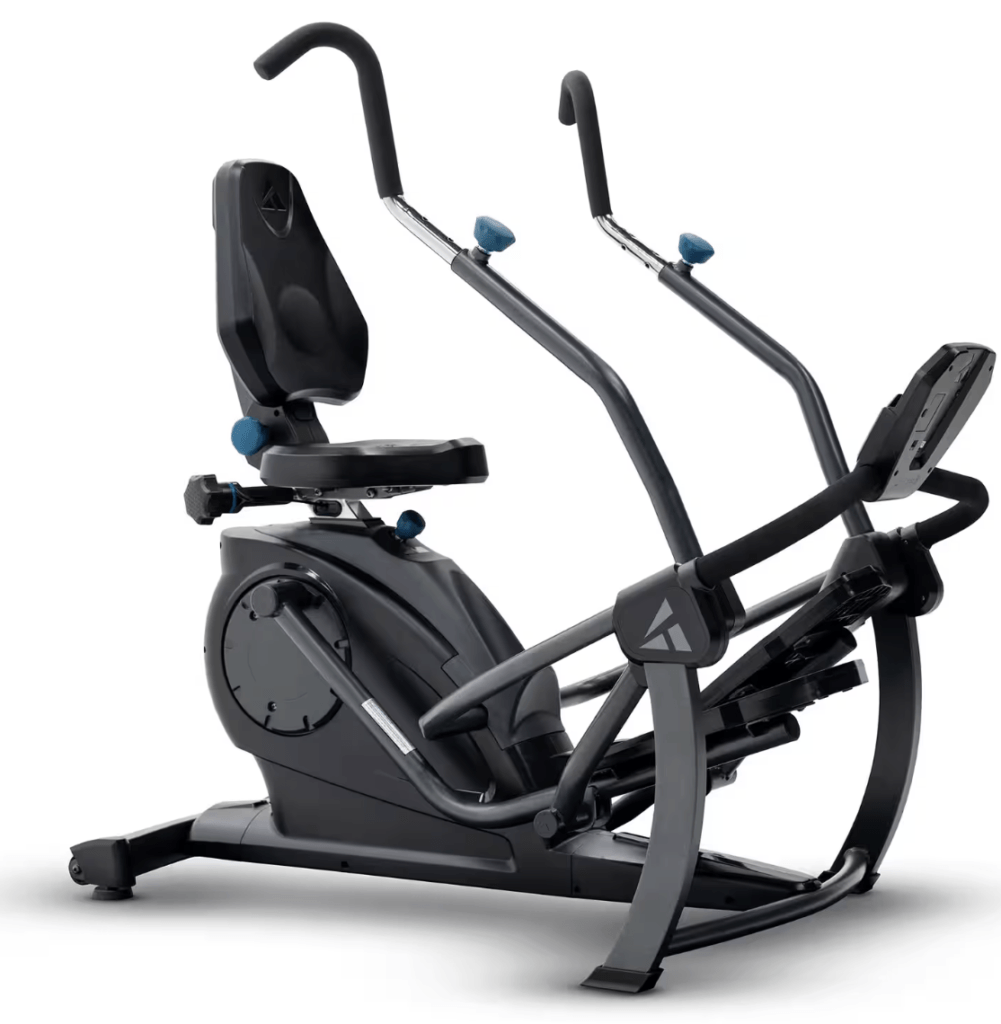
If you’re buying one machine for the first six months after a hip replacement, this is the one I’d point you at.
The reason is criterion one above.
The FreeStep uses a linear stepping stride, meaning the pedals travel forward and back along a flat path rather than around a circle.
You get to sit in a reclined seat, so you can easily avoid flexing your hip past any unwanted positions and the linear path makes for the lowest-impact exercise option for your hips and knees.
That’s a structural difference from a bike, not a marketing difference, and it’s why recumbent cross trainers are standard equipment in hospital rehab gyms.
It also runs both arms and legs, which matters more than it sounds like it should: you can offload the legs entirely on a bad day and still get a session in, rather than skipping.
Now there are several other recumbent cross trainers out there, but Teeter’s FreeSteps are the most affordable options I’ve come across that function as true cross trainers.
Which model
All three share the same stride and the same magnetic resistance system.
| LT1 | LT3 | LT7 | |
|---|---|---|---|
| Price | ~$799 | ~$999 | ~$1,499 |
| Resistance | 13 levels, 0–110 lb | 13 levels, 0–110 lb | 20 levels, 0–150 lb |
| Console | 3.5 in LCD, 4 metrics | 3.5 in LCD, 4 metrics | 9 in color LCD, 7 metrics |
| Pedal lock for entry | No | No | Yes, console-controlled |
| Seat | Cushioned, 3-position recline, height adjust | Thicker, 2 mounting positions, recline, height adjust | Largest, 3-position depth, recline, piston-assist height |
| Weight capacity | 300 lb (136 kg) | 300 lb (136 kg) | 350 lb (159 kg) |
| Warranty | 2 yr frame / 1 yr parts | 3 yr frame / 2 yr parts | 3 yr frame / 2 yr parts |
Buy the LT1 if budget is the deciding factor.
The stride — the part that matters clinically — is identical to the more expensive models.
Buy the LT3 if you’ll be on it most days for a year or more.
You’re paying about $150 for better bearings, a better seat, and an extra year of frame warranty, and the seat is the difference between a comfortable thirty minutes and a fidgety fifteen.
Buy the LT7 for one specific reason: the Step Lock holds the pedals and handles still while you get on and off.
If your balance is shaky, if you’re still using a walker, or if you’re getting on alone with nobody in the house, that feature may be worth the money by itself.
If none of that describes you, it’s a nicer console at a $500 premium.
We’ve written a fuller breakdown of the two upper models in Teeter FreeStep LT3 vs LT7.
The honest drawbacks
It won’t fit everyone. Teeter lists a height range of 4 ft 11 in to 6 ft 6 in (150–198 cm), and reviewers near the upper end of that range have reported an awkward fit. If you’re over 6 ft, use the 90-day return window as a genuine trial.
It’s big. Assembled it’s about 62 × 33 × 55 in (158 × 83 × 141 cm) and 107–110 lb (48–50 kg). There are transport wheels, but you won’t be tucking it in a closet.
Assembly is a two-person, roughly 45-minute job. Not one to do yourself six days after surgery. Teeter offers paid professional assembly, and it’s worth the money in this specific situation.
It doesn’t strengthen your abductors. Neither does any other cardio machine. See the next section.
One thing worth knowing before you pay
The FreeStep is HSA/FSA eligible.
Your plan may want a letter of medical necessity from your surgeon or PT — a short note saying the equipment is for treating a specific condition rather than general fitness.
If you’re within a few months of joint replacement surgery, that letter is usually straightforward to get, and it can effectively knock your marginal tax rate off the price.
Ask at your next follow-up appointment rather than after you’ve bought it.
Teeter also runs a 90-day return window and free shipping in the continental US, which matters when you can’t test the machine before buying.
If the Transfer Is the Real Problem: The Swivel-Seat Machines
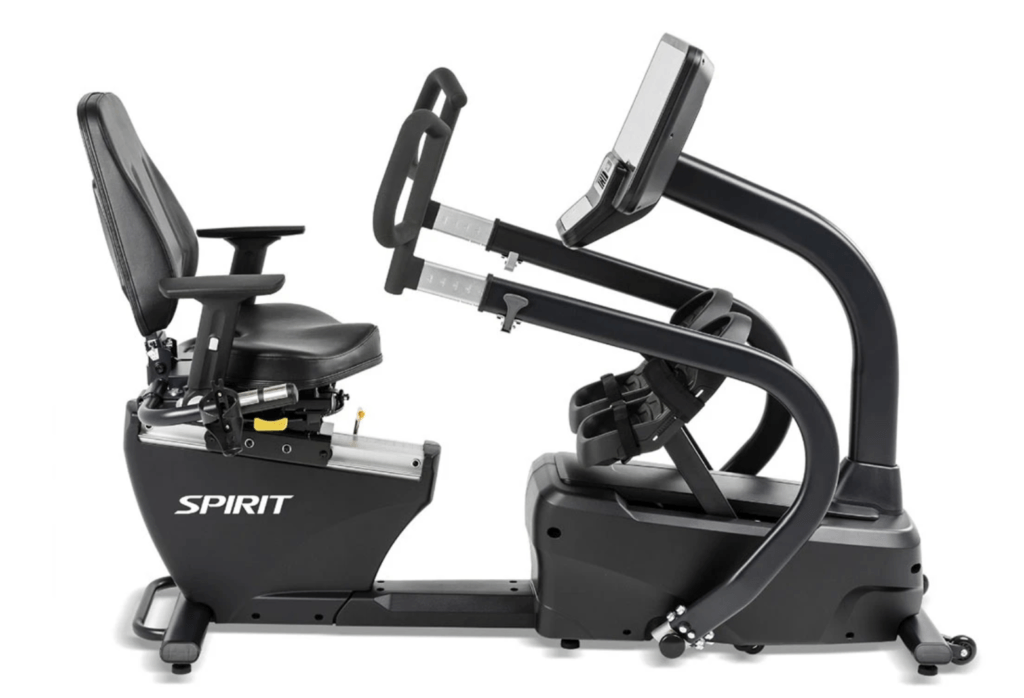
If the FreeStep felt familiar when you read about it, this is why.
There’s a tier of machine above it — the ones you actually used in the hospital or outpatient gym — and they share the same fundamental idea of a linear stepping stride from a seated, supported position.
They also cost roughly $5,000 against $699 for the entry-level FreeStep.
So the honest question isn’t which is better, because these are better – it’s whether the specific things they do better are worth the cost.
For starters, the seat swivels a full 360 degrees, making it a lot easier to get in/out of.
You sit down facing outward, then rotate to the pedals with the seat doing the turning instead of your hip.
Other big differences include how smooth and heavy-duty these machines feel and the fact they will likely last forever.
Two machines dominate this tier, and dealers routinely sell them against each other.
| NuStep T4r | Spirit CRS800S | |
|---|---|---|
| List price | ~$4,895 | ~$4,800 |
| Swivel seat | 360°, locks every 45° | 360° |
| Step length | User-controlled | Self adjusting, 1–12.5 in (2.5–32 cm) |
| Pedal/handle lock | StrideLock, standard | Not listed |
| Armrests | Retract out of the way | Adjustable height, retract out of the way |
| Weight capacity | 400 lb (181 kg) | 450 lb (204 kg) |
| Height range | 4’6″–6’4″ (137–193 cm) | 4’11″–6’6″ (150–198 cm) |
| Footprint | 60 × 27 × 45 in (152 × 69 × 115 cm) | 69 × 35 × 49 in (175 × 89 × 124 cm) |
| Warranty | 10 yr frame / 3 yr parts / 1 yr labor | Lifetime frame / 10 yr parts / 2 yr labor |
Choose the NuStep T4r if space is tight. The footprint difference isn’t marginal — the Spirit is nine inches longer and eight inches wider, which is the difference between fitting in a spare bedroom and not. StrideLock is standard, holding both pedals and arm handles still during entry, where the Teeter reserves that for the LT7. It runs on AA batteries, so it goes wherever you want it rather than wherever the outlet is. And it fits shorter users, down to 4 ft 6 in.
Choose the Spirit CRS800S if you’re tall, heavy, or badly limited in range of motion. The self-adjusting step range is the standout feature here and it’s genuinely well matched to this surgery: it starts as short as 1 in (2.5 cm) and lengthens automatically as you improve, so the machine meets whatever range of motion you have in week six and grows with you rather than needing to be reset. It also takes users up to 450 lb (204 kg) and 6 ft 6 in, where the NuStep tops out at 400 lb and 6 ft 4 in.
Who should actually buy either: someone transferring from a wheelchair or walker, someone with a second joint replacement already scheduled, someone at the extremes of the height or weight range, or someone who knows from experience they’ll still be using this machine in ten years.
Who shouldn’t: most people six weeks out from an uncomplicated hip replacement. You’d be paying roughly seven times the price of an LT1 for a swivel seat and a longer warranty.
I’ve personally seen both of these machines in patients’ homes and living facilities and I can say from experience both are exceptional machines.
I’ve seen NuStep’s T4r in more homes and I’ve used that more in rehab clinics, so if I was choosing between them, I’d probably go with that one.
But both are commercial grade machines and worth the cost if you’re looking for the feel of a facility-quality piece of equipment.
Recumbent Bikes: Cheaper, Common, and Fine With One Caveat
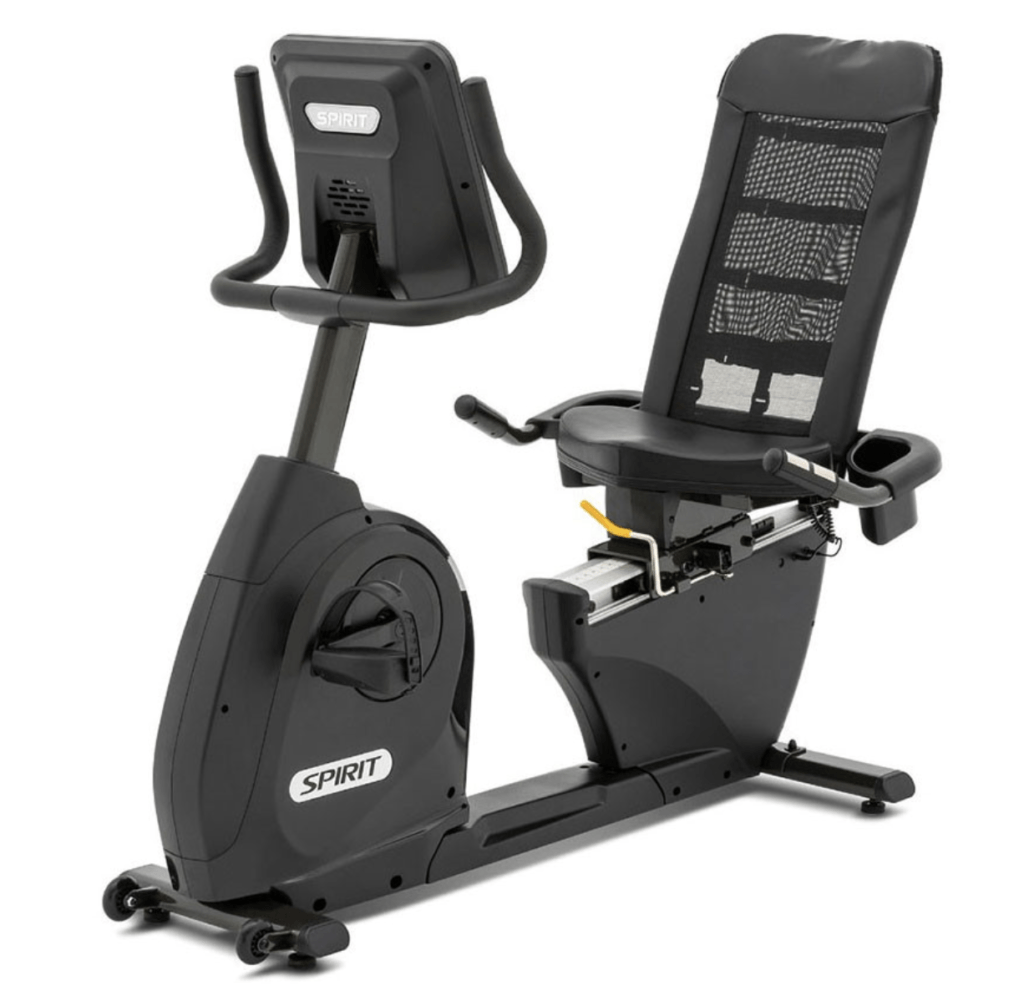
A recumbent bike moves your hip through a circle, which technically speaking is a little more impact than a recumbent cross trainer.
But most patients are still able to use these bikes pretty comfortably a few weeks post-op (assuming it’s positioned so that your hip doesn’t flex past 90-degrees, if that’s a precaution for you).
When in doubt: slide the seat back further than feels natural, and have your PT check the angle before you settle on a position.
Past the precaution phase that concern largely disappears, and a good recumbent bike does most of what a recumbent stepper does for a fraction of the price.
Three worth knowing about, all of which come up constantly in this context.
| Spirit XBR25 | Sole R92 | Schwinn 230 | |
|---|---|---|---|
| Typical price | ~$1,500 | ~$1,300 | ~$600 |
| Flywheel | 20 lb | 20 lb | 13 lb |
| Resistance | 20 levels, ECB magnetic | 20 levels, ECB magnetic | 16–20 levels, magnetic |
| Seat adjustment | Fore/aft, quick lever under seat | Fore/aft, multi-position | Fore/aft |
| Warranty | Lifetime frame / 10 yr parts / 2 yr labor | Lifetime frame / 2 yr parts / 1 yr labor | 10 yr frame/ 2 yr parts / 90 day labor |
| Best for | Getting the seat position right easily | Warranty and build | Tightest budget |
Spirit XBR25 — the one I’d pick for this specific job. Not because of the flywheel or the console, but because the fore/aft seat adjustment runs off a fast lever under the seat. That sounds trivial until you remember you’ll be moving that seat repeatedly over the first three months as your precautions lift and your range of motion changes. A seat position you can change in three seconds is a seat position you’ll actually keep correct. It also carries a heavy-duty frame and impressive warranty for the price.
Sole R92 — great features for price. Sole builds heavier than the price suggests, the warranty is strong, and it’s HSA/FSA eligible through Truemed, which matters here for the same reason it matters with the Teeter. Sole’s step-up model, the LCR, is a better machine, but it’s roughly $700 more for resistance range and a touchscreen — neither of which is doing anything for your hip.
Schwinn 230 — the budget option, with a caveat. It has been the default recommendation in this space for years, and it’s still good value if you find one. Lighter-duty, less impressive resistance system, and a shorter warranty, but about as good as it gets in this price range. Be aware that the step-through opening on these consumer bikes is narrow — around 4 in (10 cm) — which is the accessibility point from earlier in this article.
Fuller breakdowns of all three are in the best recumbent exercise bikes for seniors.
Ellipticals: A Month-Six Machine, Not a Month-Two One
An elliptical is a standing machine.
It asks for balance, single-leg weight-bearing, and enough hip extension to complete the back half of the stride — three things most people don’t have comfortably before about four months.
Which makes it a reasonable goal rather than a first purchase, and worth understanding now if you’re planning ahead.
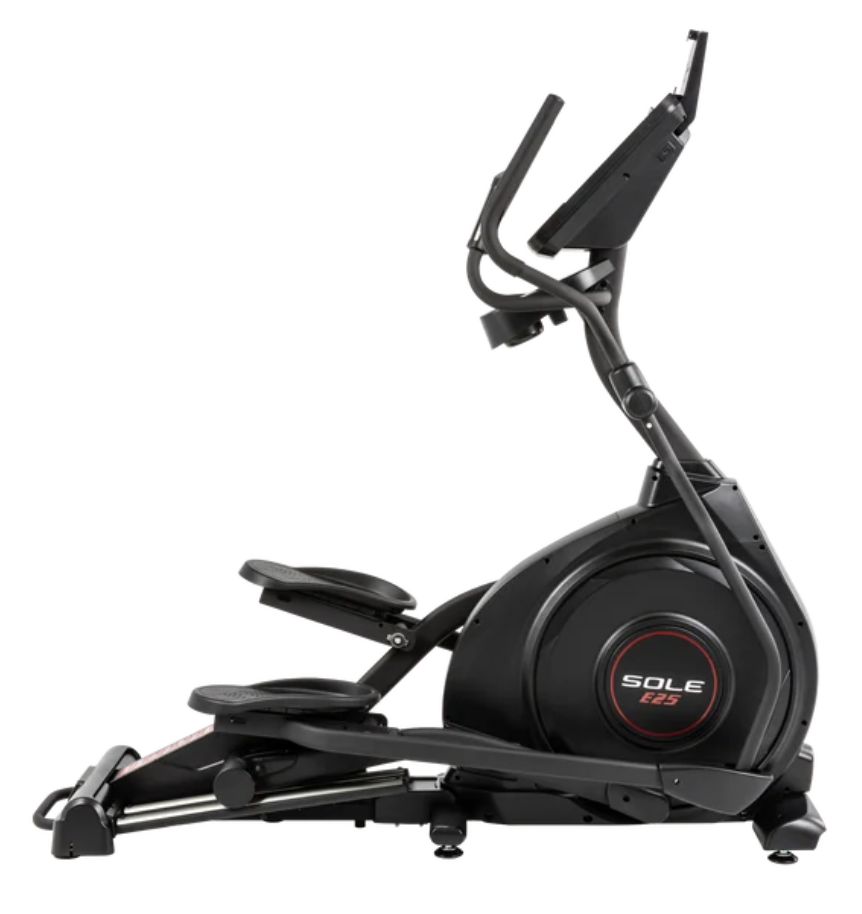
The Sole E25 is the one I’d point at, mostly because it’s well-built for an affordable home unit.
A 20″ stride, a 20 lb flywheel, a power incline, and a respectable warranty – not bad for a $1300 elliptical.
The pedals also sit a little closer together than on most ellipticals, making it more comfortable post-op.
That narrow pedal spacing keeps your foot tracking more or less under your hip rather than out to the side, which means less side-to-side weight shift on every stride — and side-to-side control is exactly what’s weakest after this surgery.
The thing to check before you buy, and nobody mentions it.
Twenty inches is a lot of hip range to produce on every single revolution (especially for shorter users), and unlike a recumbent stepper — where the stride can be an inch if that’s all you’ve got — an elliptical gives you no way to shorten it.
You either have the range or you don’t, and if you don’t, the machine will make you compensate somewhere.
It’s not a good idea to buy an elliptical until you can comfortably reach full hip extension standing — use the split-stance extension check described in still limping after hip replacement.
Also worth measuring in person: the step-up height onto the pedals.
Front-drive ellipticals like the E25 tend to sit the pedals higher than rear-drive designs, and that first step up is a real barrier for some people post-surgery.
Sole doesn’t publish the figure, so go and stand on one to see how it feels.
Our wider picks are in the best elliptical machines for seniors.
The Half Nobody Sells You: Under $100 of Strength Gear
This is the part that changes your walking.
The abductor deficit described at the top of this page doesn’t respond as much to cardio.
It responds to load, progressively, over eight to twelve weeks.
Clear all of this with your surgeon or PT first — particularly anything done side-lying or across the midline, which is precaution-dependent.
A set of loop resistance bands, light through heavy. The single most useful purchase on this page per dollar. Side-lying and standing hip abduction against a band is the direct loading exercise for the gluteus medius.
Ankle cuff weights, adjustable. For standing abduction and hip extension once bands stop being challenging. Adjustable beats fixed, because you’ll outgrow the starting weight in a month.
A sturdy dining chair with no arms. You already own it. Sit-to-stand without pushing off is one of the best progress markers you have.
If you want the programming rather than just the equipment, Strong & Steady: Strength is a 28-day structured home program built around exactly this kind of work.
What to Skip
Motorized pedal exercisers. The motor does the work. That’s the whole problem, and we’ve written about why at length. There’s a narrow case for them in circulation and range of motion for someone who genuinely cannot move a limb — post-hip-replacement is not that case.
Vibration plates. Standing on a vibrating platform is not resistance training, and the evidence for meaningful strength gain in this population is thin.
Seated hip abduction machines. The ones at the gym where you push your knees apart against pads. They load the muscle in a position that isn’t how it works during walking, and the seated posture is often deep hip flexion. Standing and side-lying work transfers better.
Mini steppers and under-desk pedals. Unstable, unadjustable, and no way to control hip angle.
Balance boards and wobble cushions, early. Excellent equipment at the right time. That time is after you have the strength to control the instability, not before.
Some links below are affiliate links — see our affiliate disclosure.
Budget Tiers
| Budget | What to get |
|---|---|
| Under $100 | Bands, ankle weights. This is the highest-return money on the page |
| $500–700 | The above plus a Schwinn 230, or a FreeStep LT1 if you’d rather have the stepping motion than the bike |
| $850–1,300 | The above plus a FreeStep LT3, a Sole R92, or a Spirit XBR25 — or a Sole E25 elliptical if you’re already past month four |
| $1,400 | The above plus a FreeStep LT7, if the pedal lock solves a real problem for you |
| $4,000+ | A NuStep T4r or Spirit CRS800S, new or certified pre-owned, if transfers are the actual barrier |
Note the pattern: the strength gear is in every tier.
If your budget only stretches to one thing, it isn’t the machine.
How to Actually Use It in the First Twelve Weeks
Assuming you’ve been cleared.
Weeks 2–6. Five to ten minutes, zero resistance, once or twice daily. The goal is movement and circulation, not fitness. Stop before you’re tired.
Weeks 6–12. Build toward fifteen to twenty minutes, five days a week, at a resistance where you could still hold a conversation. Add the band work on the same days.
Months 3–6. Twenty to thirty minutes, and start adding resistance in small increments. Strength work moves to standing and loaded.
Past six months. Aim for the general guidance of about 150 minutes a week of moderate activity, and keep the abductor work going indefinitely — it’s maintenance now, not rehab.
Track something. Minutes, resistance level, or how many sit-to-stands you can do without hands.
Progress over six to twelve weeks is too slow for memory to judge honestly, and writing it down is what keeps people going through week three.
If You Only Take One Thing From This Page
Buy the bands and the ankle weights first.
That’s the sixty dollars I mentioned at the top, and it’s the only thing on this page that loads the muscle still measurably weak years after this surgery.
Then add a machine if you want cardio on the days walking isn’t happening. For most people six weeks out, that’s the FreeStep LT3.
The order matters more than the brands do.
Within three months of surgery? Clear both with your surgeon or physical therapist before you start.
Frequently Asked Questions
How soon after hip replacement can I use an exercise machine? Most surgeons clear gentle seated cardio somewhere between two and four weeks, assuming the incision is healing well and you’re comfortable. That’s typical, not universal, and it’s a question for your surgeon rather than a website.
Is a recumbent bike or a recumbent cross-trainer better after a hip replacement? In the first twelve weeks, the cross-trainer, because the linear stride is a little lower-impact. After precautions lift, the gap narrows considerably and a recumbent bike is a perfectly good choice for less money.
Is a NuStep or Spirit CRS800S worth it compared to a Teeter FreeStep? They’re better machines — they’re the ones in the rehab gym for good reasons. Whether either is worth roughly seven times the price depends almost entirely on what you’re looking for. The swivel seat is a great feature, but these more expensive machines offer a smoother feel, more sophisticated resistance systems, and better warranties.
Which recumbent bike should I get after a hip replacement? Prioritize how easily you can move the seat and resistance system features. You’ll be adjusting seat position repeatedly across the first three months as precautions lift, and the bikes with a quick lever under the seat get adjusted correctly far more often than the ones needing a knob and a wrestle.
Can I use an elliptical after hip replacement? Eventually, usually — around month four to six for most people. The specific thing to check isn’t your fitness, it’s your hip extension: an elliptical has a fixed stride you can’t shorten, so you need the range before you buy the machine, not after.
Will an exercise machine fix my limp? No, and this is the most important thing on the page. A limp after hip replacement is usually abductor weakness plus an old walking habit, and cardio addresses neither. Here’s what actually does.
Can I use my HSA or FSA for exercise equipment? Often, with a letter of medical necessity from your surgeon or physical therapist. Requirements vary by plan, so check with your plan administrator before you buy rather than after.
Do I need to buy anything at all? No. Walking, a chair, a wall, and a set of bands will get most people most of the way. Equipment buys you consistency in bad weather and a way to train when walking still hurts — it doesn’t buy you an outcome you couldn’t otherwise reach.
What if I’ve already finished physical therapy and still can’t do much? Ask for a referral back. Discharge from rehab is usually driven by insurance authorization and functional milestones, not by whether you’ve finished recovering. A fresh assessment is a reasonable thing to request.
This article is educational and is not a substitute for individual assessment. Do not begin new exercises or use new equipment after joint replacement surgery without clearance from your surgeon or physical therapist. Worsening pain, fever, or a feeling of instability should be reported to your surgeon promptly.